News · 16 April 2026
Analysing the terrain in pétanque: How to spot and tame treacherous slopes
NewsA 2% slope is invisible to theThe physics of slopes — why 2% changes everything
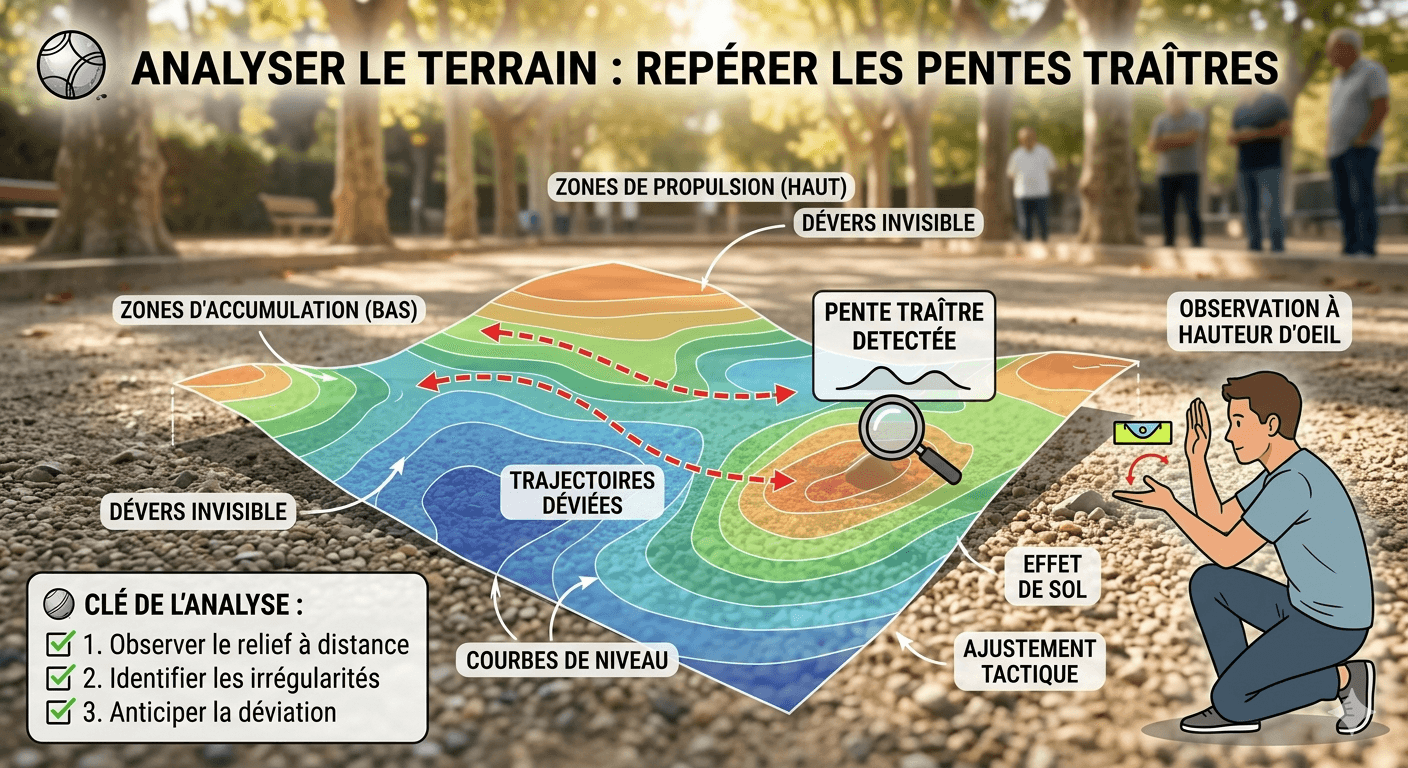
A 2% slope means that the terrain drops by 2 centimetres every metre. Over an 8-metre terrain, that is a total drop of 16 centimetres — invisible to the naked eye, imperceptible when walking on it. And yet, for a bowl rolling at low speed at the end of its run, it is enough to deviate from its trajectory.
📐 EFFECTS OF SLOPES ACCORDING TO THEIR INTENSITY SLOPE VISIBLE TO THE EYE DEVIATION (8m) GAME IMPACT 1–2% 🔴 No 15–30 cm Subtle but constant — creates unexplained misses 2–4% 🟡 Difficult 30–60 cm Significant — must be actively compensated 4–8% 🟠 Perceptible 60 cm – 1 m+ Important — radically changes strategy 8%+ 🟢 Obvious 1 m+ Determining — the slope becomes the main factor 🎙️ Paquita on invisible slopes "I lost a whole tournament because of a slope I hadn't seen. My bowls always went 20 to 25 cm to the left. For five ends I thought I had a swing problem. Going back up after the game, I placed a bowl on the ground and released it flat — it rolled gently to the left. It was the slope. The terrain barely sloped, but that was enough. If I had done that before the first end, I would have won at least two more points." — Paquita 🔬The physics is simple: gravity creates an acceleration component in the direction of the slope. The slower the bowl (end of run, soft shot), the more this gravitational component dominates relative to the kinetic energy of the bowl. Treacherous slopes act mainly on slow bowls — a pointing bowl at the end of its roll is far more sensitive to a 2% slope than a direct hit at full speed. That is why pointers suffer more from slopes than shooters.
The 5 types of slopes and irregularities to know
⬇️ Longitudinal slope — in the direction of play The terrain drops in the direction of the throw — from the circle towards the jack, or the reverse. Downhill, the bowls accelerate after their delivery and often go too far. Uphill, they stop earlier than expected. It is the easiest slope to identify visually but also the most deceptive regarding the force to use. ✓ Downhill: reduce the speed, land further in front of the jack. Uphill: increase the speed, land closer. ⚠ Medium impact — compensable ↘️ Transverse slope — perpendicular to the direction of play The terrain drops laterally — to the left or right relative to the direction of the throw. It is the most treacherous slope because it cannot be seen from the circle. The bowl rolls straight for 3 to 4 metres then begins to drift laterally as it loses speed. Players attribute this drift to their action when it comes from the terrain. ✓ Deliberately aim to the opposite side of the slope — if the terrain drops to the left, aim slightly to the right. The bowl will finish in the centre. 🔴 High impact — very treacherous 🌀 Combined slope — diagonal The terrain drops both in the direction of play and laterally — along a diagonal axis. The bowl deviates simultaneously in distance and direction. Very hard to anticipate, it forces a double correction (force and axis) that is rarely perfect. Terrains with a diagonal slope generate whole games of incomprehension. ✓ Identify the two components separately (longitudinal AND transverse) and correct each one. Use the first ends as an observation test. 🔴 Very high impact — requires analysis ⛰️ Local bump or hollow A spot on the terrain that is not in the general slope — a bump, a hollow, a harder or softer area. The bowl interacts differently in this zone and can change direction or speed abruptly. Unlike continuous slopes, local bumps are unpredictable if not identified — and once identified, they can be used tactically. ✓ Place the jack so that the opponent has to go through the bump. Or, if it is your bowl that has to cross it, adapt the angle to go around. ⚠ Variable — can become an advantage 🌿 Change in surface texture Not a slope as such, but a change in absorption and friction at a precise spot on the terrain — sandier, more compact, grassy, wet area. The bowl changes speed abruptly when passing from zone A to zone B. This "terrain step" generates sudden stops or unexpected accelerations. ✓ Identify the transition zones during observation. Adapt the delivery so that the bowl touches the ground in the zone that corresponds to the desired speed. ⚠ Often underestimated6 methods to detect a slope before playing
METHOD 01 👁️ The skimming eyeLower yourself to terrain height (on one knee or crouching) and look at the terrain in the direction of play from the circle. Even a 3% slope becomes visible when you look "skimingly" rather than from above.
Reliability: medium METHOD 02 🌊 The flat-released bowlPlace a bowl in the centre of the terrain, hold it still then release it gently. The direction in which it naturally rolls indicates the actual slope. The speed indicates its intensity. A direct and foolproof method.
Reliability: very high METHOD 03 💧 Observe the puddlesAfter rain or on wet terrain, puddles accumulate in the low points. Observing their location gives an exact map of the low zones of the terrain — and therefore of the slope directions.
Reliability: very high (if wet terrain) METHOD 04 👣 Walk the terrainCross the terrain slowly, perpendicular to the direction of play. Proprioceptive perception (the feet "feel" the slope) reveals transverse inclinations that the eye does not pick up. Concentrate on your ankles.
Reliability: medium to high depending on sensitivity METHOD 05 🔍 Observe the marks from previous endsThe marks left by the bowls of previous games reveal where they landed and how they rolled. If all the marks are shifted to one side, it is a transverse slope. If the bowls have all gone past on the same side, it is a longitudinal slope.
Reliability: high on earth terrain METHOD 06 📐 Spirit level (for perfectionists)A small pocket spirit level (less than 10€) placed on the surface reveals any slope with absolute precision. Used by some high-level players on first observation. Impractical in tournaments but useful in training.
Reliability: maximalThe observation protocol — the 5 most profitable minutes
Observation of the terrain must not be improvised — it must be methodical and quick. Here is the 5-step protocol that good players carry out on every new terrain, in under 5 minutes.
1 Overview from the edge of the terrain Before stepping onto the terrain, observe it from the outside, looking sideways. A longitudinal slope (in the direction of play) is more visible from the side than from inside. Check whether the back of the terrain is at the same level as the foreground. Also look at whether the boundaries are parallel to the ground. ⏱️ 30 seconds 2 Skimming eye from the throwing circle Position yourself in the circle, lower yourself and look at the terrain at bowl height in the direction of play. Check whether the jack zone appears to be on a slight slope. Do the same looking sideways from the middle of the terrain to detect a transverse slope. ⏱️ 1 minute 3 Flat-released bowl test Position yourself in the centre of the terrain and release a bowl gently, flat. Observe the direction and the distance it travels. Direction = direction of the dominant slope. Distance = approximate intensity. Redo the test in the jack zone (7–8 metres from the circle) which may have a different inclination. ⏱️ 1 minute 4 Identifying local irregularities Walk the terrain slowly, observing the stony zones, the bumps, the damp marks, the grassy zones, the hollows left by previous games. Note mentally (or physically) their location — they will be your allies or your enemies depending on the placement of the jack. ⏱️ 1 minute 30 5 Tactical decision and sharing with the team On the basis of your observations, make the two or three basic decisions : at what distance to play the jack (avoid the steep-slope zone or, on the contrary, use it), which side to favour, what deviation compensation to incorporate into your aim. Communicate this information to your team before the first end. ⏱️ 1 minute 📓 Keep a terrain notebookIf you play regularly on the same terrains (club terrain, usual boulodromes), keep a terrain notebook: for each known terrain, note the identified slopes, the treacherous zones, and the effective compensations. This information accumulated over several seasons gives you a huge advantage over players who rediscover the terrain every time. In a club tournament, you are playing at home — you should know every centimetre better than your opponents.
Visualising the effect of a transverse slope
📐 THEORETICAL VS ACTUAL TRAJECTORY ON A TRANSVERSE SLOPE ← Aimed trajectory (theoretical) ← Actual trajectory (slope) ● Jack Bowl here ↓ Direction of the slope Desired trajectory Actual deviation trajectory Target jackTreacherous scenarios — the situations that trap you
TREACHEROUS SLOPE N°1 The progressive drift that starts halfwayThe bowl starts straight for the first 3 metres then begins to drift laterally. The player believes their bowl got off well — then sees it drift inexplicably. The slope only acts when the bowl slows down enough for gravity to be stronger than inertia. This phenomenon suggests an action problem when it is the terrain.
❌Symptom: "My bowl starts well then always goes to the same side. Maybe my swing is faulty laterally?" — 8 players out of 10 attribute it to their action. ✓Solution: Test the flat-released bowl on the zone concerned. If it rolls in the same direction as the deviation, it is the terrain — not the action. Deliberately aim to the opposite side of the deviation, all the more so as the bowl is slow. TREACHEROUS SLOPE N°2 The slope that changes according to the position of the jackYou have played three ends at 7 metres without a problem. On the fourth end, the jack lands at 9 metres. Your bowls deviate systematically. The zone around 9 metres has a different slope from the zone at 7 metres — you were not in it. The terrain is never uniformly sloped over its entire length.
❌Symptom: "I was pointing perfectly at 7 metres and suddenly at 9 metres, nothing works." Change of zone = change of rules. ✓Solution: The initial observation must cover all the potential playing zones — not only the most likely zone. When the jack changes zone, mentally take the first bowl as an observation test. TREACHEROUS SLOPE N°3 The counter-slope after the deliveryThe terrain drops slightly in the direction of play (favourable longitudinal slope) but rises just before the jack zone (counter-slope). The bowl accelerates on the descent then brakes abruptly on the ascent and stops well before the target. The player corrects by forcing — and their bowl goes well past on the following flat zone.
❌Symptom: The bowls alternate between "too short" and "too long" without explanation — because the correction is always excessive in the face of an unidentified slope break. ✓Solution: Identifying slope breaks (the places where the slope changes direction) is as important as identifying the slope itself. A bowl ideally lands in the break zone — it absorbs its transition energy there. TREACHEROUS SLOPE N°4 The slope the opponent knows and you do notYou are playing away on the opposing club's terrain. Their players know exactly how the terrain slopes — they have played on it 200 times. Their compensations are automatic. Yours have to be built in real time. It is a concrete home/away advantage, not only psychological.
❌Symptom: Playing away, your bowls seem "not to work" — when in reality your opponents know the corrections and you do not. ✓Solution: Carefully observe the first bowls of the opposing team before playing. If their bowls also deviate — there is no slope, it is general uneven terrain. If their bowls are straight — they are compensating for a slope you have not yet identified.Adapting your play according to the identified slope
DOWNHILL LONGITUDINAL SLOPE ⬇️ The terrain drops towards the jack- Reduce the throwing speed — the bowls arrive faster than expected
- Land further in front of the jack — the bowl will accelerate after the delivery
- For shooting: reduce the angle to avoid excessive bounces
- Place the jack shorter to limit the downhill distance
- At the end of the run, allow for residual overshoot
- Increase the throwing speed — the bowl slows down quickly
- Land closer to the jack — less residual roll
- Watch out for shots: the bowl also slows down after impact
- Stakes ends: prefer pointing uphill because the result is more stable
- The opponent's bowl in place is stable — harder to knock out uphill
- Deliberately aim to the right of the jack according to the observed deviation
- The correction increases with the slowness of the bowl (end of run)
- On a hard shot: little or no correction (speed dominates)
- Placing the jack slightly to the right of centre compensates naturally
- Observe the opponent's bowl to calibrate the exact compensation
- Deliberately aim to the left of the jack according to the observed deviation
- Potential advantage for players whose natural trajectory starts slightly to the left
- Place the jack to the left of centre to create a naturally compensated axis
- In shooting: the shot will make the opponent's bowls deviate less towards you
- Use the slope to channel the opponent's bowls out of the jack zone
The terrain observation checklist
✅ WHAT YOU MUST KNOW BEFORE THE FIRST END 🔍Does the terrain drop in the direction of play? (longitudinal slope — towards the jack or towards the circle?) 🔍Does the terrain drop laterally? (transverse slope — to the left or right?) 🔍Is there a slope break (a place where the slope changes direction)? 🔍Are there local bumps or hollows in the probable playing zones (7 to 9 metres)? 🔍Does the terrain change texture (sandy zone, compact zone, wet zone)? 🔍What aiming compensation should I incorporate according to the main slope identified? 🔍Which terrain zone favours my team and disadvantages the opponent according to their profiles?Exercise — developing the eye for the terrain
01 Terrain mapping — learning to see what you do not see 📍 Club terrain ⏱️ 20 min 🗺️ Terrain readingThe aim is to map a known terrain to identify all its slopes and irregularities, then to verify these observations by throwing test bowls. This exercise develops the eye for the terrain permanently.
Observation step: before throwing a single bowl, spend 5 minutes observing the terrain with the 6 methods described (skimming eye, flat-released bowl, walking the terrain, observing the marks). Note mentally or on paper the zones you identify as sloped or irregular. Confirmation test: throw 5 bowls from the usual circle towards a zone you think has a transverse slope. Observe whether the deviation matches your prediction. If yes — your reading is correct. If no — refine your observation method. Compensation test: incorporate the correction into your aim (aim to the opposite side of the predicted slope) and throw 5 new bowls. Observe whether the correction improves precision. Adjust the amplitude of the correction according to the results. Test on unknown terrain: on a terrain you have never played (opposing terrain playing away), repeat the 5-minute observation protocol before the first end. Compare your predictions with the actual results of the first bowls. Your correct prediction rate is your terrain reading score. 6-week goal: identify the main slopes of an unknown terrain in 5 minutes with a predictive accuracy rate above 70%. This level is enough for a real tactical advantage in tournaments. 📖 PAQUITA'S BOOK Mastering the terrain — and everything on itTerrain reading, delivery adaptation, placement tactics, complete biomechanics... Paquita's book gives the tools to play intelligently on any terrain — 100 numbered exercises, programmes by level.
📦 Order on AmazonFAQ — Your frequent questions
Is it allowed to drop a flat ball to test the terrain before playing? + Yes, totally. The FIPJP regulations do not restrict pre-conduct observations. You can move around the field, observe, touch the ground, and test balls before your lead officially begins. The only restriction: once your lead has started (first official throw), you can no longer modify the state of the field (sweeping prohibited in particular). But observation and preliminary tests are free. In practice, the one-minute rule applies as soon as it is officially your turn to throw — field tests are therefore done between ends or at the start of the competition. How can I adapt my reading of the terrain in the event of rain during the game? + Rain changes the terrain in real time — making it difficult to read because your initial observations can become outdated. The main adaptations: rain reveals slopes (water flows towards low areas - observe where it accumulates). It also makes slopes more active — a 2% slope that was almost negligible in the dry becomes significant in the wet because the ball has less friction and rolls further in the direction of the slope. During a game in the rain, use the first balls of each lead as an observation test and adapt in real time. My team doesn't want to waste time observing the field — how can I convince them? + The most effective argument is the result. On a sloping pitch that your team knows and the opponent does not, you have a 20 to 30% accuracy advantage on balls that cross the sloping zone. In terms of score, it can represent 2 to 3 points in a game. The simplest counter-demonstration: during a training game, divide the team into two groups — one which observes the pitch for 5 minutes, one which plays directly. Compare the results over the first 5 rounds. The gap is generally convincing. Do the indoor courts (indoor bowling alleys) also have slopes to watch out for? + Yes — and often more than outdoor courts. Indoor bowling alleys are frequently installed in buildings where the floor has not been perfectly leveled. Synthetic or fine sand pitches on slightly inclined concrete slabs can have slopes of 1 to 3% which no one has ever formally measured. Indoors, the more regular texture of the terrain makes the slopes more “active” — a ball slides better and follows the slope more faithfully. The detection methods work in the same way, with one advantage: indoors, the ball dropped flat works even better on a regular surface. 📎 Related articles Equipment Choosing your bowls — grooving and behaviour on sloped terrain Equipment Inox vs carbone — difference on varied terrains Regulations The one-minute rule — observe quickly before throwing Regulations Ground marks — what is allowed as a reference Video Umpiring videos — situations on difficult terrains Tools Free PetanqueLand tools© Pétanque by Paquita — petanqueland.fr ·
📖 Paquita's book on Amazon
The deviation values presented are observed approximations — they vary according to the type of bowl, the surface of the terrain, the humidity and the rolling speed. Use them as reference points, not as absolute truths.