News · 14 April 2026
The perfect pendulum in pétanque: Mastering arm-leg synchronisation
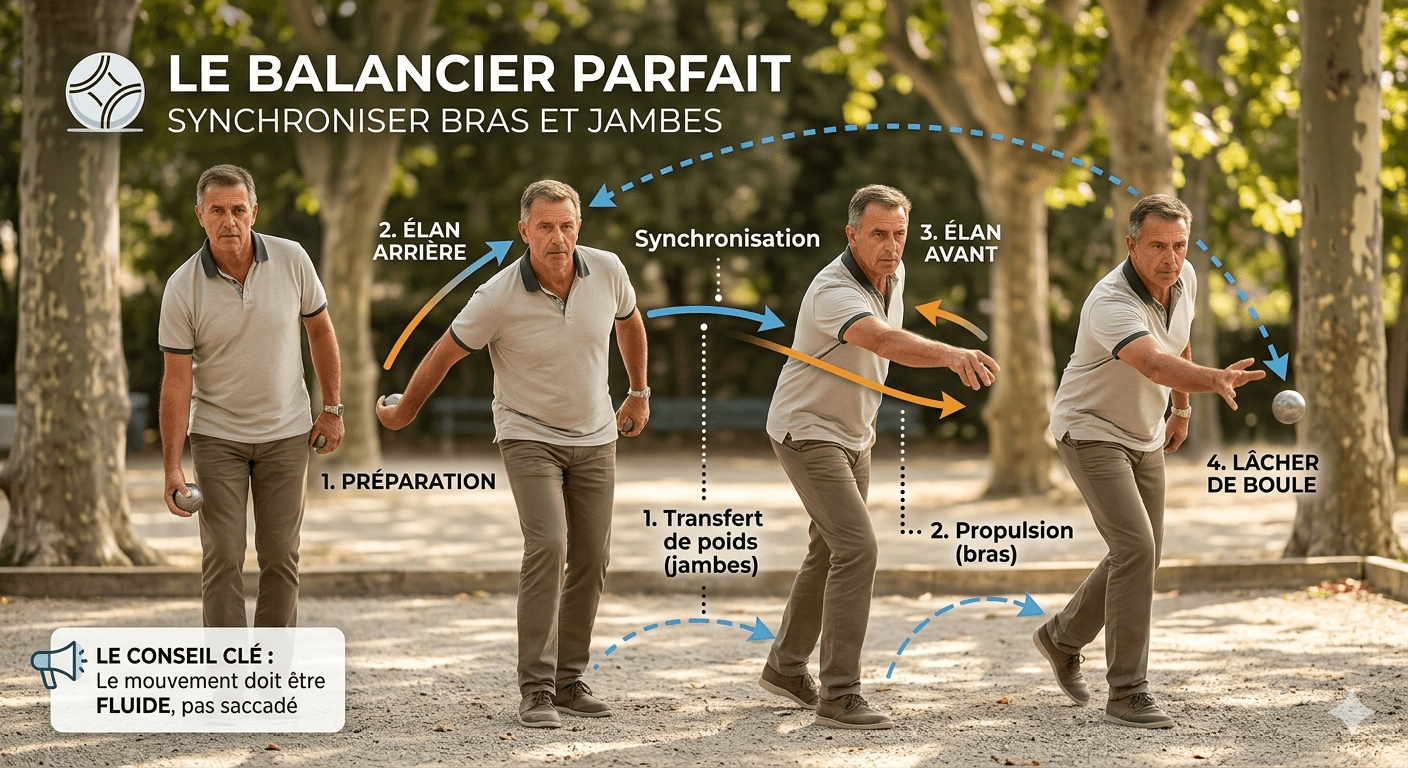
NewsAsk a beginner how he throws his ball. He will tell you "I'm doing the arm movement". This is where everything starts to go wrong. The pétanque swing is not an arm movement — it is a whole-body movement, in which the arm is simply the last link in a chain that begins in the feet and works its way up to the fingers. Understanding this chain means understanding why good players seem to make no effort for specific results — and why earlyThe kinetic chain — from the sole to the fingers
In sports biomechanics, we talk about kinetic chain to describe how body segments transfer energy to each other during a movement. In the pétanque throw, this chain runs from the feet to the fingers — and each link has its precise role.
ANCHOR POINT 🦶 The feetThe base of the entire chain. They're in the circle, fixed, and form the fulcrum against which all the energy of the motion is transmitted. An unstable or lifting foot creates an immediate break in the chain — energy is lost sideways.
SHOCK ABSORBER 🦵 The kneesSlightly bent at the start, the knees gradually straighten during the forward movement. This slight extension transfers part of the energy from the lower body upward — it's the legs' contribution to throwing power.
CONTROLLED PIVOT 🧍 Hip and torsoThe hips stay facing the target throughout the movement — they don't pivot. The torso leans very slightly forward during the arm's descent to accompany without blocking. A torso that's too rigid blocks transmission; a torso that pivots deflects the axis.
MAIN MOTOR 💪 The shoulderThe shoulder is the pivot point of the pendulum. It must stay low and relaxed — a shoulder that rises during the movement reduces the range and creates an unpredictable high trajectory. The shoulder guides, it doesn't pull.
FINAL TRANSMISSION 🤚 Arm, wrist, fingersThe arm is a rigid pendulum (elbow nearly extended) that amplifies the motion driven by the shoulder. The wrist follows naturally. The fingers transfer the energy to the boule at the moment of release — that's where final precision is decided.
🔬A well-executed pétanque pendulum mechanically resembles that of a pendulum clock: a mass (the boule) suspended from a rigid arm (the extended arm), pivoting around a fixed point (the shoulder). The regularity of this pendulum — same range, same speed, same axis with every repetition — is the condition for consistent results. Anything that disrupts the pendulum disrupts the result.
The 5 phases of the perfect pendulum
A complete, quality pendulum unfolds in 5 distinct but continuous phases — there's no pause between them, only a coherent mechanical flow.
⚙️ THE 5 PHASES OF THE PENDULUM — COMPLETE SEQUENCE PHASE 1 ⬆️ High start Arm extended, boule at hip height. Body centered, knees slightly bent. Eyes on the targeted landing spot. PHASE 2 ⬅️ Backswing Arm goes backward, naturally, without forcing. The knees stay slightly bent. The weight stays centered. The wrist stays neutral. PHASE 3 ⭐ ↕️ Low point Critical moment. Arm perpendicular to the ground, boule at its lowest. The knees begin their extension. The shoulder starts driving forward. PHASE 4 ➡️ Forward swing The arm rises forward. The knees extend gradually. The weight transfer happens slightly forward. The release point approaches. PHASE 5 🎯 Release + follow-through Release at the defined point. The arm continues its motion naturally (follow-through). The feet stay on the ground until the boule lands. ★ Phase 3 (low point) = critical synchronization moment between the legs and the arm 🎙️ Paquita on the low point "The low point of the pendulum is where everything pivots. That's where the energy from the legs meets the arm's swing — if the two are synchronized, the boule leaves with a fluidity you recognize immediately. If the knees extend too early (before the arm reaches the bottom), the energy is dissipated before being transmitted. Too late — after the arm has already risen — and the arm alone carries the weight of the boule without the legs' support. The low point is the meeting. Both parts of the body have to arrive there together." — PaquitaThe role of the legs — often ignored, always decisive
It's the great forgotten of pétanque biomechanics. Most beginner players — and even some experienced players — treat their throw as a purely arm-and-shoulder motion, with the legs serving just as support. That's a fundamental mistake.
ROLE 1 ⚡ Upward energy transferThe slight extension of the knees during the forward swing phase creates a vertical impulse that travels up the chain and adds to the arm's energy. It's a free energy contribution — with no additional effort from the arm. Good throwers use it naturally, often without being aware of it.
Moment: Phase 3 → Phase 4 (low point to forward swing) ROLE 2 🏗️ Vertical axis stabilizationSlightly bent knees lower the body's center of gravity — which naturally makes it more stable. A player standing with stiff legs sways sideways during the throw. A slightly bent player absorbs micro-movements without transmitting them to the arm.
Moment: The entire duration of the pendulum ROLE 3 ⚓ Final anchoring — fixed feetBoth feet stay on the ground until the boule has landed. A foot that lifts before this moment — even by a few millimeters — breaks the fulcrum of the entire chain and deflects the throwing axis. It's also a regulatory fault that can be penalized in tournaments.
Moment: Phase 5 (release + follow-through) ROLE 4 ⚖️ Weight balance during the throwThe body's weight shifts slightly forward during the forward swing — not a spectacular weight transfer, but a natural inclination of the center of gravity that accompanies the direction of the throw. Weight that stays too far back forces the arm to "throw" instead of letting the pendulum "fall" naturally.
Moment: Phase 2 → Phase 4 🦵 The mirror exercise for the legsDo your usual pendulum in front of a side-on mirror — without a boule, in slow motion. Look exclusively at your knees. They should be slightly bent at the start, stay bent during the backswing, and extend gradually from the low point, to be nearly straight at the moment of release. If your knees stay completely rigid throughout, you're not contributing to the chain. If your knees move a lot or jerkily, you're introducing instability. The ideal bend is subtle — barely visible, but present.
The counter-balance of the free arm
🤜 THE ARM THAT DOESN'T THROW The free arm isn't passive — it balances During the pendulum, the arm holding the boule moves backward then forward. If the other arm stays completely still alongside the body, the active arm's movement creates a compensating rotation of the torso — the body tries to maintain its balance by rotating the shoulders. This pivot deflects the throwing axis.The solution is a natural counter-balance of the free arm: when the active arm goes backward, the free arm goes slightly forward — and vice versa. This mirror movement, symmetrical and natural, cancels the compensating rotation of the torso and lets the shoulders stay perpendicular to the throwing direction throughout the movement.
Watch good players in tournaments: their free arm doesn't hang inert — it oscillates slightly in opposition to the active arm. This movement is often unconscious in experienced players. In beginners, it has to be learned deliberately before it becomes automatic.
- ✓Free arm slightly forward at rest — the natural starting position is free arm slightly forward, not alongside the body
- ✓Low-amplitude mirror movement — the oscillation of the free arm is small, not spectacular. A large gesture of the free arm itself creates destabilization
- ✓Relaxed free hand — no closed fist, no tense fingers. Tension in the free hand travels up into the shoulder and tenses the entire active arm
- ✓Shoulders parallel to the throwing axis — check from the side that both shoulders stay level and perpendicular to the jack's direction
The 6 most frequent synchronization breaks
1 Knees that don't move — arm carrying alone The player keeps their legs stiff throughout the throw. The arm has to produce all the energy alone. Result: the throw lacks fluidity, the boule leaves "pushed" rather than "thrown". Irregular distances, muscle fatigue late in the tournament. ✓ Become aware of knee bend at the start and work on synchronized extension at the low point. The slow-motion exercise is essential. 2 Knees that extend too early — energy dissipated before the throw The knees straighten during the backswing, before the arm reaches the low point. The legs' energy is dissipated before being useful. The player rises and falls jerkily, which disrupts the pendulum's axis. ✓ Make the low point conscious as the signal for knee extension. Useful exercise: mark a spot on the ground, the arm must "point" to this spot before the knees begin to extend. 3 Shoulder that rises during the forward swing The active shoulder rises during the arm's forward ascent. The boule's trajectory becomes high and arched. The release point varies according to the shoulder's height. Result: long boules on some shots, short on others. ✓ Check from the side that the shoulder stays low and fixed throughout the movement. A high shoulder often means the arm is "pulling" instead of "letting" the pendulum "fall". 4 Hip rotation during the throw The hips pivot during the movement — the player "turns" slightly on themselves. The throwing axis shifts sideways. The boules deviate systematically in one direction (depending on the direction of rotation). ✓ The hips must stay perfectly facing the target throughout the pendulum. Exercise: place a light obstacle against the hips to immediately feel any involuntary pivot. 5 Free arm completely still The free arm stays stuck to the body with no counter-balance. The shoulders pivot slightly to compensate, deflecting the axis. The player doesn't notice it — it's a fault invisible to the untrained eye but measurable on the trajectory. ✓ Consciously introduce a slight mirror swing of the free arm. Side-on video immediately reveals whether the shoulders pivot — without video, the fault is almost imperceptible through introspection. 6 Foot that lifts before the boule lands A foot — usually the rear one — lifts instinctively during the hand follow-through. It's a natural reaction of the body to accompany the forward movement. But this lifting breaks the anchoring and can slightly pivot the axis. It's also a regulatory fault. ✓ Keep both feet conscious on the ground until landing. A simple exercise: train on a surface that leaves footprints (fine sand, damp earth) to observe whether the feet moved after each throw.3 exercises to anchor synchronization
01 The pendulum in slow motion — no boule, no target 📍 Living room or hallway ⏱️ 10 minutes ⚙️ Feel the chainThe goal is to feel the synchronization without the distraction of the boule and the result. By slowing the movement to 10% of its normal speed, the brain can process each phase separately and identify the breaks.
Starting position: in the regulation circle or in your usual position. Active arm extended, hand empty, free arm slightly forward. Knees slightly bent. Backswing in slow motion: send the arm backward very slowly. Feel the free arm go slightly forward in mirror. Check that the knees stay bent and don't change yet. Low point: stop for a second at the low point. Check that the knees are still bent, that the hips are facing the target, that the shoulder is low. Forward swing and knee extension: move forward again by gradually extending the knees. The free arm comes back slightly backward. The active arm rises toward the release position. Follow-through and feet on the ground: simulate the release and continue the natural follow-through. Check that both feet stayed on the ground throughout. Do 15 repetitions in slow motion before gradually accelerating. 02 The throw with footprint marking 📍 Sandy terrain ⏱️ 15 minutes ⚙️ Foot anchoringOn sandy or slightly damp terrain, footprints reveal after each throw whether the feet moved. It's immediate, concrete feedback — with no possible interpretation.
Place your circle on a surface that retains footprints (sand, damp earth). Consciously mark the position of both feet before throwing. Throw normally — point or shoot depending on your role — focusing on keeping both feet still. After the throw, look at the footprints : did they move? A front foot? A rear foot? Both? The direction of the movement indicates which phase broke the anchoring. Do 20 throws and note the percentage of times the footprints didn't move. Target: 90% or more in a session. 03 The side-on video — revealing what you can't feel 📍 Any terrain ⏱️ 15 minutes ⚙️ Visual diagnosisProprioception (the internal sensation of the body in space) is often misleading — you "feel" the movement is correct when it isn't. Side-on video is the only tool that objectively reveals synchronization.
Place your phone on a stand at hip height, strictly side-on, about 3 meters away. Film in normal resolution — no need for slow motion at first. Throw 10 boules normally, without trying to change anything. The aim is to observe your usual motion, not a forced one. Watch the video looking successively for: knee bend (does it exist?), extension at the low point (synchronized?), the shoulder (does it stay low?), the hips (do they pivot?), the free arm (does it swing?), the feet (do they stay on the ground?). Identify a single priority fault — not all at once. Work on this fault only during the next 3 sessions, then re-film to measure improvement.The 3 levels of pendulum mastery
🌱 Level 1 — Conscious pendulum The movement is correct but requires conscious attention.Synchronization exists but breaks under pressure.
The knees move if you think about them.
Duration: the first 3 to 6 months. ⚡ Level 2 — Automated pendulum The kinetic chain executes without conscious attention.
Synchronization holds in low-stakes tournaments.
Micro-breaks persist under heavy pressure.
Built over 3 to 12 months of structured practice. 🏆 Level 3 — Impervious pendulum Synchronization is identical in a friendly game and in a final.
The motion repeats with no measurable variation over 50 throws.
Pressure doesn't affect the mechanics.
The result of 1 to 3 years of deliberate practice. 📖 PAQUITA'S BOOK The complete biomechanics — Parts 1 and 2 of the book
Foot position, anchoring, alignment, range, arm speed, role of the wrist, height according to distance... Paquita's book details the shooter's entire biomechanics with 100 numbered exercises and correction protocols.
📦 Order on AmazonFAQ — Your frequent questions
Le balancier pour le point et le balancier pour le tir sont-ils identiques ? + La structure de la chaîne cinétique est identique — les mêmes segments sont impliqués dans le même ordre. Ce qui diffère : the range (shooting requires a greater range for more power), the speed (shooting is faster), and the hand position (notamment pour le rétro du tireur). Les principes de synchronisation bras-jambes décrits dans cet article s'appliquent aux deux rôles — travailler la synchronisation en pointant améliore directement la qualité du geste en tirant, et vice versa. Quelle flexion de genou est correcte — 10°, 20°, 30° ? + Il n'y a pas d'angle universel — il varie selon la morphologie du joueur (jambes longues ou courtes, poids corporel) et son niveau de confort. La référence pratique : une flexion correcte est celle qui permet de feel a slight tension in the quadriceps (muscles à l'avant de la cuisse) sans inconfort. Si vous ne sentez rien, les genoux sont trop raides. Si vos genoux "tremblent" ou si c'est inconfortable, la flexion est trop prononcée. Pour la majorité des joueurs, ça correspond à une flexion de 10 à 20° — imperceptible à l'œil mais fonctionnelle pour la chaîne cinétique. Je suis gaucher — les principes du balancier sont-ils les mêmes ? + Oui, en miroir. Tous les principes décrits dans cet article s'appliquent identiquement aux gauchers — simplement avec le bras gauche comme bras actif et le bras droit comme bras libre. La chaîne cinétique, la synchronisation jambes-bras, le contre-balancement, la position des pieds — tout fonctionne de façon symétrique. Les exercices sont utilisables sans modification. Mes douleurs au coude ou à l'épaule peuvent-elles venir d'un balancier mal synchronisé ? + Oui — c'est une cause fréquente et sous-estimée. Quand les jambes ne contribuent pas à la chaîne cinétique, le bras compense en portant seul la charge de la boule sur des centaines de répétitions. Cette surcharge chronique du bras, de l'épaule et du coude peut générer des douleurs type tendinite ou inflammation de la coiffe des rotateurs. Si vous avez des douleurs régulières au bras ou à l'épaule après une session, vérifiez en priorité si vos genoux travaillent pendant le balancier — c'est souvent là que le problème se cache. Consultez un médecin du sport en cas de douleur persistante. 📎 Related articles Equipment Choosing your boules — the weight that suits your motion Equipment Stainless vs carbon — what impact on your pendulum? Equipment Top 3 best shooter boules 2026 Rules The one-minute rule — managing your throwing time Video Why changing bowls does not change your level Tools Free PetanqueLand tools© Pétanque by Paquita — petanqueland.fr ·
📖 Paquita's book on Amazon
The biomechanical principles presented in this article are based on general studies of pendular movement in precision sports. Any persistent pain during practice should be evaluated by a healthcare professional.